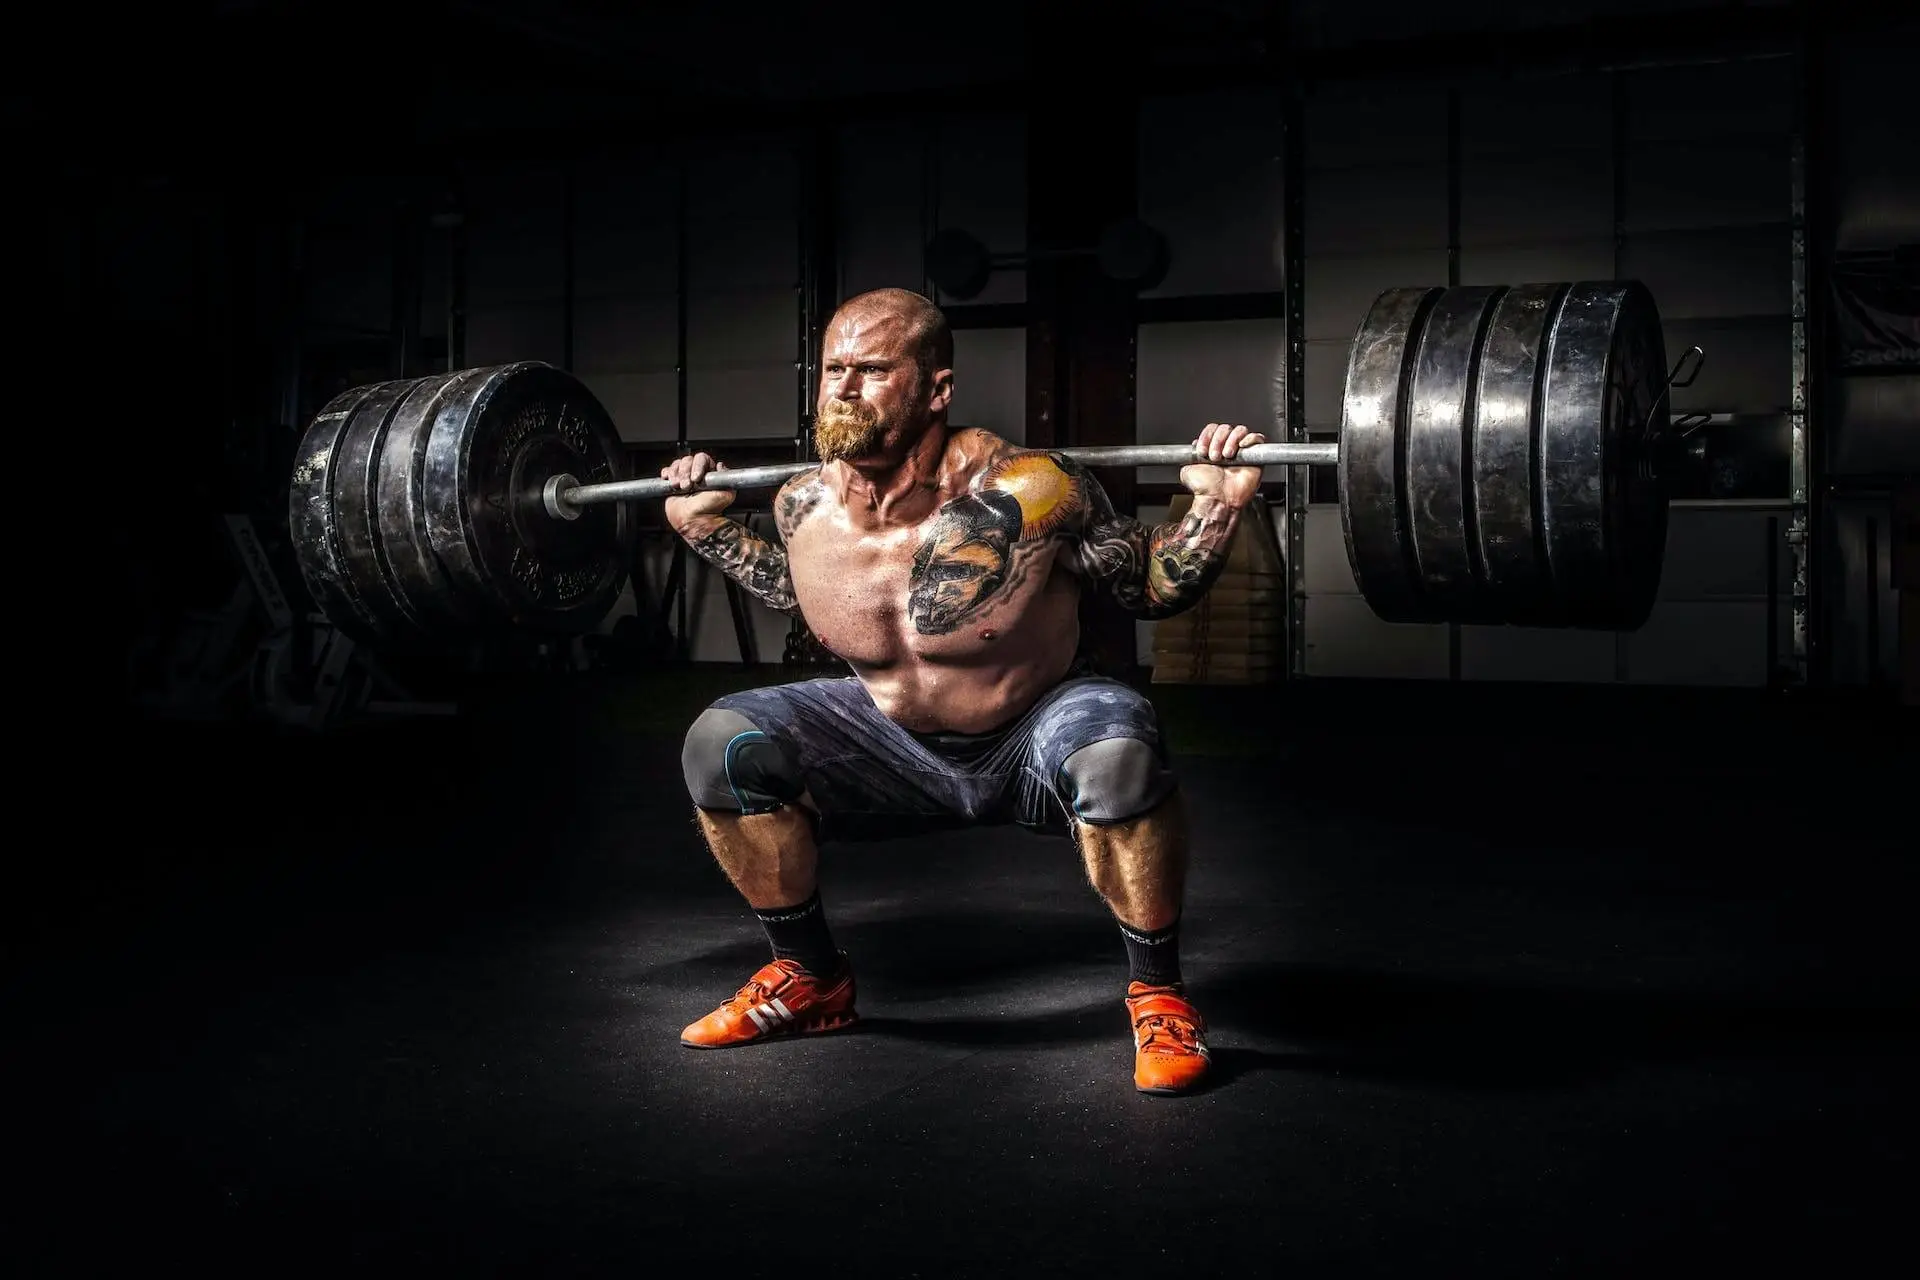
The Ultimate Barbell Squat guide
The barbell squat is an absolute powerhouse exercise. It’s a game-changer for those seeking to sculpt their physique, build strength, and ramp up their fitness level.
The barbell squat holds the crown as one of the most popular exercises for a reason – it truly delivers results!
TLDR; Head Straight to the “How to do a Barbell Squat Step-By-Step Guide (with VIDEO)”
Picture this: you take your stance with feet hip-width apart, a barbell gracefully resting across your shoulders, and anticipation building within you. As you descend, your thighs reach a parallel position with the floor, engaging every muscle fibre. Pause for half a second, and then with sheer determination, you powerfully rise back up.
A barbell squat is a compound movement that fires up your glutes, quads, hamstrings, core, and lower back muscles all at once – an electrifying full-body experience.
If your goals are to:
- Develop muscle and enhance strength swiftly with squats.
- Achieve weight loss and achieve a toned physique at an accelerated pace with squats.
- Enhance your physical appearance and confidence without clothing, courtesy of squats’ rapid results.
- Improve your overall well-being and happiness with squats, which expedite the process.
- Experience a sense of empowerment and awesomeness during your gym sessions by incorporating squats.
- Improve a weak core, get stronger legs and maximize growth
In this comprehensive article, I’ll cover all the essentials of the barbell squat!
Deep, safe squats enhance flexibility, making you resilient and reducing the risk of future injuries.
Table of Contents
Defining the Squat and Benefits of this Exercise
Squats, a fundamental functional movement, are a big deal in our daily lives. Let’s dive into the many benefits and see why adding squats to your routine is a smart move.
- We’re designed to squat: As we grow older and spend more time sitting in strange positions, our squat form goes from perfect to terrible.
In many countries, people often chill in a full squat for hours at a time. From an evolutionary standpoint – it makes sense that we are genetically wired to, and can be pretty decent at – squatting.
In the past, people didn’t stop squatting as they got older like we do today. They kept squatting throughout their lives, without fancy furniture or technology.
That’s why squatting is one of the key moves for functional fitness.
- Doing squats can beef up your bones and muscles, while also looking after your knees.
By strengthening your knees, hips, and whole body, you lower the risk of injuries during sports and everyday activities like getting up or down.
Deep, safe squats enhance flexibility, making you resilient and reducing the risk of future injuries.
The Bodyweight Squat
Whooah Cowboy (or girl).
Be careful not to run before you can walk. Jumping straight into a barbell squat may not be for you yet.
Unless you know you can properly squat confidently, keep reading, or else move on to the big boy (or girl) section. Good squat technique is crucial.
How to do a proper bodyweight squat with good form
Learn the fundamentals of executing a flawless bodyweight squat. Gain a comprehensive knowledge of all the essential aspects required to perform this exercise correctly.
Setup
The setup for the squat exercise is incredibly simple:
- Position your feet slightly wider than your hips.
- Point your toes slightly outward, at an angle of about 5 to 20 degrees (the wider your stance, the more you’ll need to rotate your feet outward).
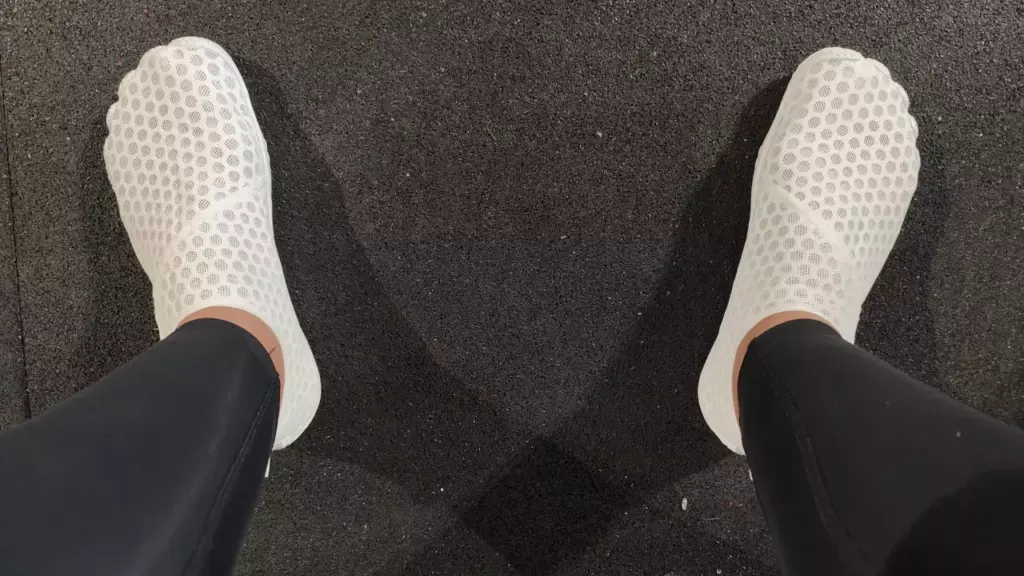
- Gaze directly ahead and select a point on the wall directly in front of you.
- Focus on this spot throughout the entire squatting motion, avoiding the temptation to glance downward at the floor or upward at the ceiling.
Steps to do a bodyweight squat
- Extend your arms directly in front of you, aligning them parallel to the ground. Maintain a proud and upright chest, while keeping your spine in a neutral position.
- Ensure that your weight is evenly distributed on your feet, with a focus on placing it on the heels and the balls of your feet, as if they were firmly planted on the ground. Throughout the movement, you should have the ability to wiggle your toes, although this isn’t a requirement for squatting.
- Keep your entire body tight the entire time, with your core flexed like you’re preparing for a surprise belly bop!
- Take a deep breath, allowing your stomach to expand. Initiate the movement by hinging at your hips and pushing your buttocks back. As your knees start to bend, ensure that your hips are positioned back, emphasizing the correct sequencing of the movement rather than relying on keeping your knees bent.
- When performing a squat, it’s important to maintain proper alignment of your knees with your feet. For beginners, focus on pushing the knees outward to align with the feet. Avoid pushing them wider than your feet. It’s crucial to prevent inward knee movement during the exercise, a common mistake to watch out for.
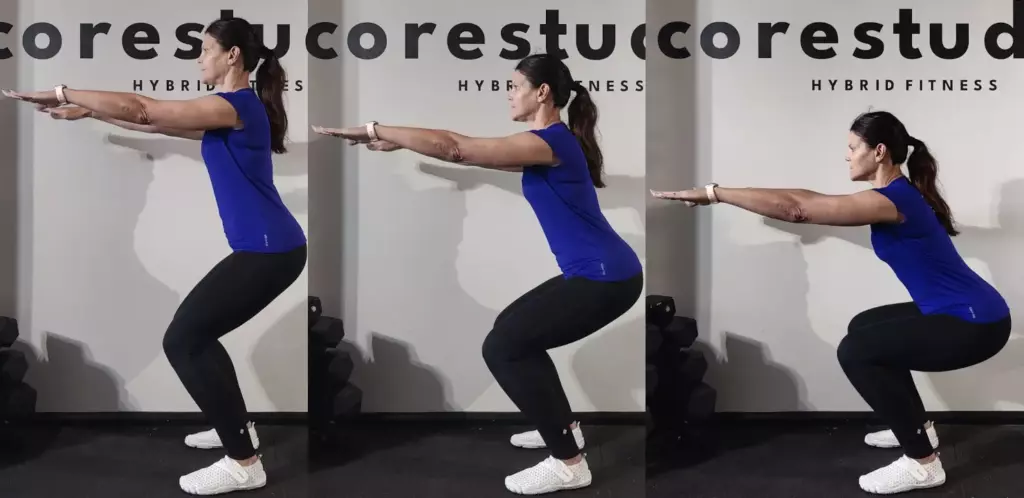
- Get down in a squat until your hip joint goes lower than your knees (what we call “parallel” in the squat game). Note: if you THINK you might not be squatting deep enough, you probably aren’t!
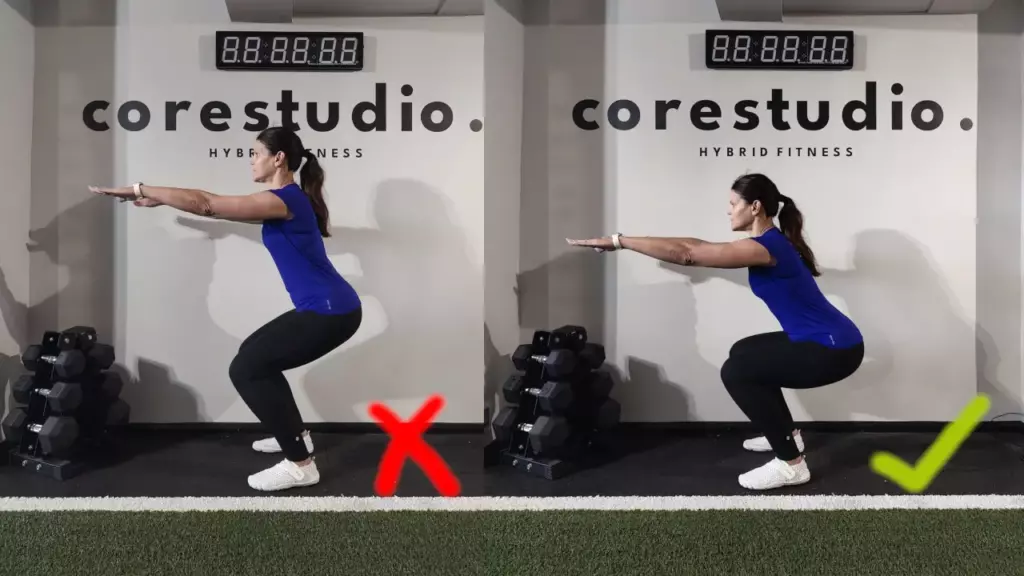
When you reach the bottom, it’s time to rise back up gracefully from your squat position:
- With a focus on maintaining stability, exhale and powerfully push through your heels while ensuring the balls of your feet remain grounded.
- Maintain the outward drive of your knees, just as you did during the descent. At the top, engage your glutes by squeezing them firmly. This ensures effective utilization of your gluteal muscles.
Once you can knock out multiple sets of 15+ deep bodyweight squats with proper form, it’s time to level up to barbell squats!
Moving on to the Barbell Squat
The Barbell Squat is a killer exercise that, when done right, works almost all your muscles. It’s perfect for strengthening and building core and leg muscles, and it also does wonders for your stabilizer muscles.
Anatomy of a Barbell Squat – Breaking Down the Move
The barbell squat is an excellent exercise for strengthening the muscles of the lower body.
To begin with, first, you stand with your feet hip-width apart and hold a loaded barbell across your upper back with both hands.
Your grip should be slightly wider than shoulder-width apart with the weight evenly distributed across your back.
Next, you bend your knees and keep your chest up as you lower yourself into a squat position.
Make sure to keep your weight in your heels and push your knees out as you go down.
Keep lowering until the tops of your thighs are parallel to the ground, then pause and press yourself up to return to the starting position.
Throughout the squat movement, you have to keep your abdominal muscles engaged and maintain a neutral spine by looking forward with your chin slightly tucked in (not lifted). Also, make sure to breathe steadily throughout each rep.
As you lower into the squat, inhale through your nose and as you press up exhale through pursed lips (mouth closed). This helps engage additional muscles for stability while also providing proper oxygen flow during exercise.
Once you reach parallel (or just below), pause at that bottom position for one second before pressing back up to standing. This will ensure that you get full range of motion which will help build muscular strength over time and prevent injury.
When returning up, focus on driving through your heels while ensuring that your back remains in its natural arch throughout the entire movement – do not round it or lean forward overly far as this can put strain on other stabilizing muscles or cause injury.
Finally, aim to repeat this same movement continuously for a predefined amount of repetitions and sets, depending on individual fitness goals or current level of muscle endurance/strength/stamina.
Equipment Needed to do a Barbell Squat
- Squat Rack (recommended)
- Barbell
- Weight plates
- Mirror (optional but if you do not have a personal trainer it is a must)
Clothing and Footwear
- Comfortable (stretchy or oversized) pants or leggings
- Vest Top or similar (so you or your trainer can identify and make corrections to bad posture)
- Weight lifting shoes or flat gym trainers, or opt for a barefoot approach – IMPORTANT NOTE: Running shoes or similar are not ideal as you need stability and the cushioning in these shoes reduces your static stability
Barbell Squat Setup
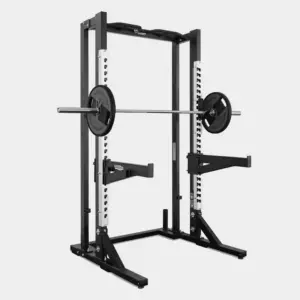
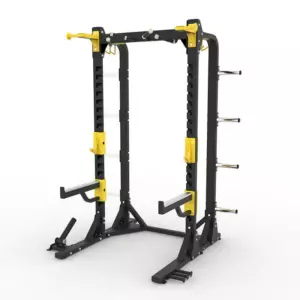
STEP 1: Discover your squat rack! It will resemble this, featuring an unattached barbell:
A. Squat Stand:
B. Power Cage/Squat stand:
C. Half Rack (Least favourite*):
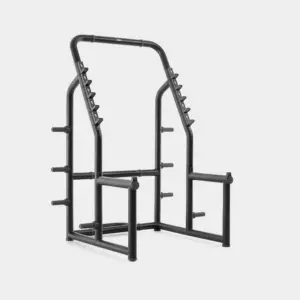
*I’m not a fan of Half-racks without adjustable safety bars, you know? If you drop to a low squatting depth, the barbell might end up hitting those immovable bars! Not cool, right? So, if you have the choice, go for the A or B options instead!
Note: A squat stand is vastly different from a Smith Machine, where the barbell is connected to the machine and moves up and down along two bars.
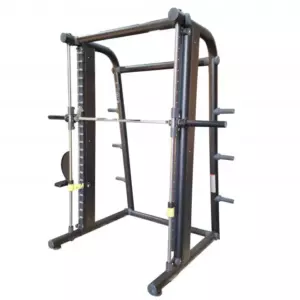
You do NOT want a Smith Machine.
To perform a barbell squat correctly and safely, it is crucial to have a completely unattached barbell. Avoid using a machine and instead choose a free barbell for optimal squat form.
This can be a debatable topic, and ultimately, it comes down to personal preference. However, I would like to present a few reasons why avoiding Smith Machine squats might be beneficial:
- The path of travel for the bar is restricted
- You are not using several key muscles as the machine is doing some of the work for you
- You are not using the same set of muscles as you would when doing a barbell squat
- Machine squats do not translate well into an unassisted barbell squat. If you regularly squat 100kg on a machine you will be in for a surprise when attempting a 100kg barbell squat as the bar will feel much heavier.
STEP 2: Set the height of the bar to be about the same height as your collarbone.
Unsure about how to adjust the bar height? Let me guide you:
When faced with options that are either too high or too low, it is advisable to set the pins slightly lower than your desired height.
This ensures that you won’t have to strain by getting up on your toes to rack or unrack the bar, particularly as the weight increases.
Prioritizing comfort and ease of use is crucial, especially when dealing with heavier loads.
STEP 3: Decide if you are going to do a high bar barbell squat or a low bar barbell squat. Either barbell squat is fine, but there IS a difference:
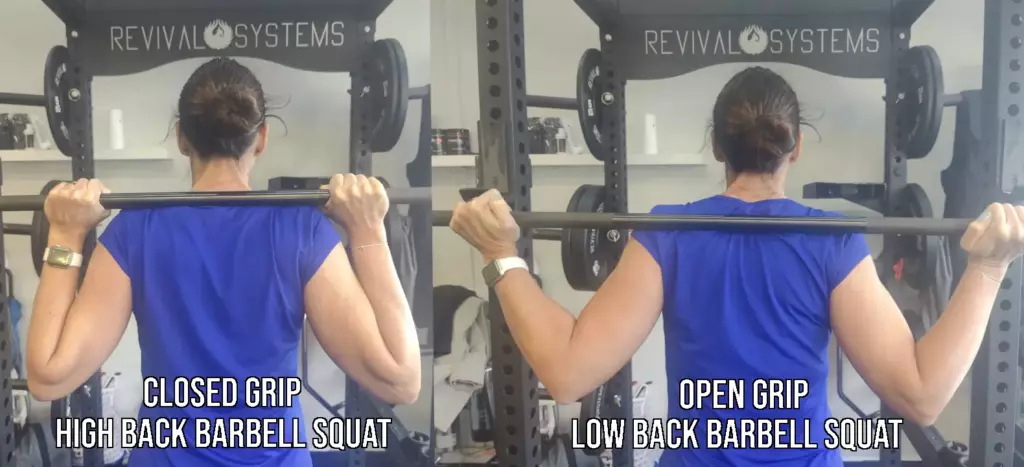
The “Low Bar Back Barbell Squat” is a widely practised technique embraced by beginners, general lifters, and powerlifters alike.
Starting Strength teaches this particular form, making it one of the top-notch beginner’s books available.
Henceforth, our focus shall remain on this version for the remainder of this section.
- Always do a barbell squat with just the bar to start
No matter your goal of squatting 300kgs, it’s always wise to begin with just the bar.
Starting with proper form and gradually adding weight will set a solid foundation for success.
Step By Step Guide on How to Do a Proper Barbell Back Squat
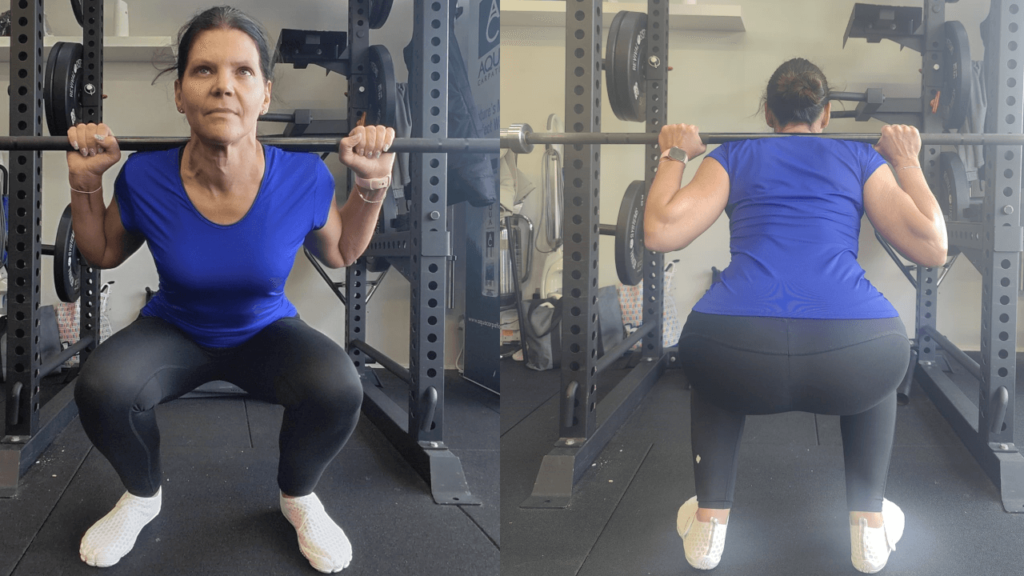
So, you’re gonna face the bar, step under it, and put your hands around it on either side of you. Now, for this type of barbell squat in our example, we’re gonna want a thumbless grip. That way, our wrists are properly aligned with our forearms.
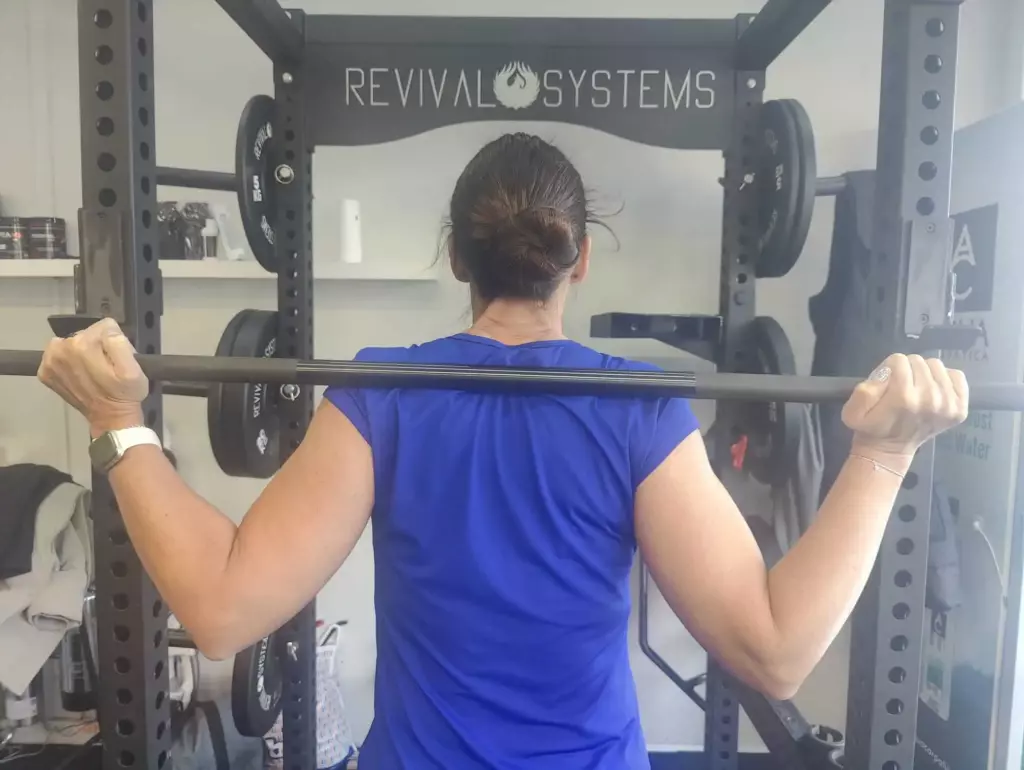
The width of your grip relies on flexibility. However, typically, a narrower grip (hands closer to your shoulders) aids in creating a substantial platform for resting the bar on the meaty upper traps of your upper back. This positioning allows for optimal support and stability.
If you lack the flexibility for the narrower grip (which is super common), start wider, then slowly bring it in as you get more flexible.
See the difference here between a “high bar, wrapped grip” (Left) and a “low bar, thumbless grip” (right):

Time to unleash the beast mode with a back barbell squat! Let’s squat it like it’s hot!
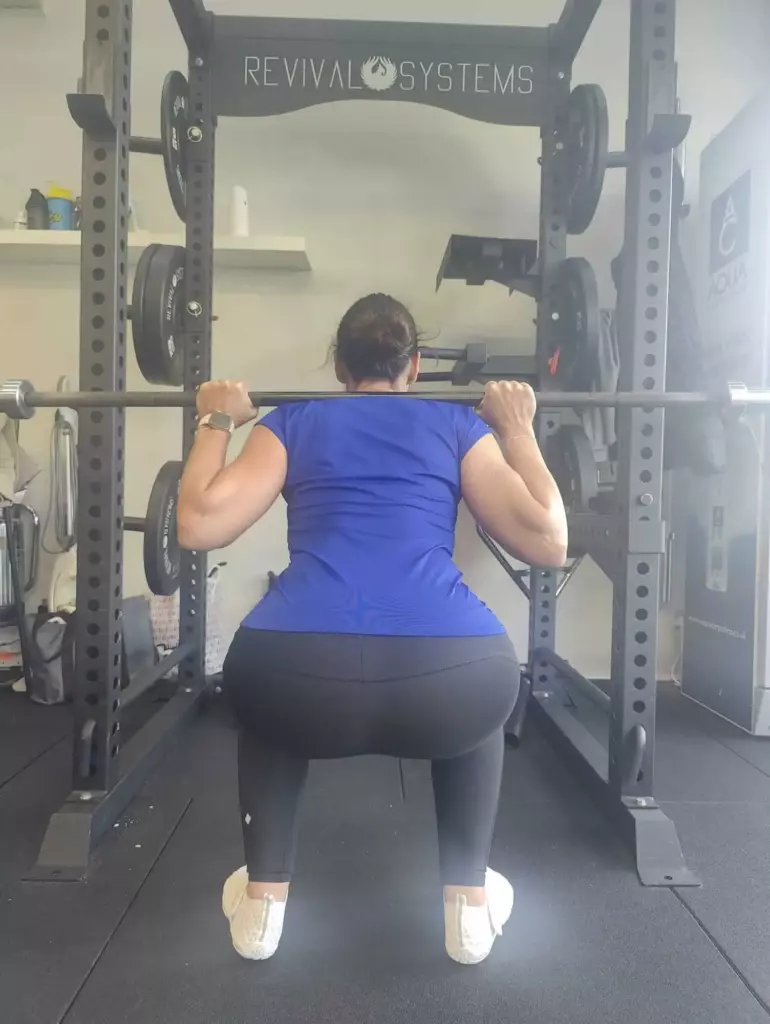
Make sure to check out the video below, give it a listen and follow the instructions. If you need to restart, just come back and read this description.
Let’s break it down step by step:
- Take a moment to step back from the supports with the weight on your shoulders.
- Make sure your feet are a tad wider than hip-width apart.
- Angle your toes slightly outwards, just a bit.
- Alright, let’s do this! Activate your core, tighten those glutes, and take a nice deep breath into your belly.
- Take it nice and easy as you squat down, shifting your butt back. Keep going until your legs are parallel or even lower – basically, the hip crease should be below your waist.
- Now, explode back up to the starting position.
- After completing your set, proceed with caution as you walk forward to return the weight to the rack, gently lowering it onto the supports while ensuring safety.
Give yourself a high-five because you just rocked that barbell squat! Keep up the awesome work!
Not sure if your barbell squat is deep enough?
Record yourself or have your trainer evaluate your movements. You know, most people I see doing a barbell squat in a gym don’t go deep enough!
How To Bail Out of a Squat Safely
If you’re gonna do a barbell squat, you gotta know how to “fail” at squatting safely! I mean, seriously, there’s nothing scarier than being stuck at the bottom of a squat and not having a clue how to get out of there!
A barbell squat is quite different from a barbell deadlift in that regard: if you struggle with a deadlift, you simply don’t lift the weight.
If you mess up a barbell squat, you’re stuck under a bar… with possibly loads of weight on top.
This can lead to SERIOUS injury. So please, learn how to bail out of a barbell squat safely before you start attempting to do a heavy barbell squat.
This will help you gain the confidence to push yourself and get stronger!
Proper Form Tips for an Effective Barbell Squat
Whole Body Tension
Whole body tension is an important part of maintaining proper form and technique during a barbell squat. When performing a barbell squat, the whole body must remain tight and engaged to properly execute the move.
This keeps the core stable and helps to ensure that the knees stay aligned with the toes, which reduces any undue stress put on the joints or muscles in the lower body. It also helps to improve balance, stability, and power during the exercise.
Whole body tension also helps to protect against potential injuries while lifting heavy weights by allowing for better control of the barbell. Overall, maintaining proper whole-body tension when performing a barbell squat is essential for both the safety and effective execution of this exercise.
Feet Shoulder Width
Feet should be shoulder width apart for barbell squats because it provides the most stability. When your feet are too close together, it can cause instability and imbalance, which makes it difficult to stay in proper form and puts unnecessary strain on your upper back muscles.
On the other hand, when your feet are too far apart, you won’t be able to get low enough into a squat position and distribute the weight evenly. Shoulder width keeps your centre of gravity balanced and allows you to reach full depth without excessively arching your back.
Keeping your feet shoulder-width apart helps proper form while also preventing any potential injury.
Hands Wider Than Shoulder Width Apart
Hands should be slightly more than shoulder width apart when performing a barbell squat because it helps to keep your torso stable and upright. When you have your hands too close together, it can cause your torso to lean forward, which can lead to poor posture and form.
But having your hands slightly wider than shoulder-width will ensure that you stay steady throughout the entire exercise. In addition, having your hands wider than shoulder-width apart can also help to engage more of the muscles in your back and legs for a more effective workout.
Different Variations of the Barbell Squat and How to Incorporate Into Your Workout
Different Squat Options for Beginners (Box Squat):
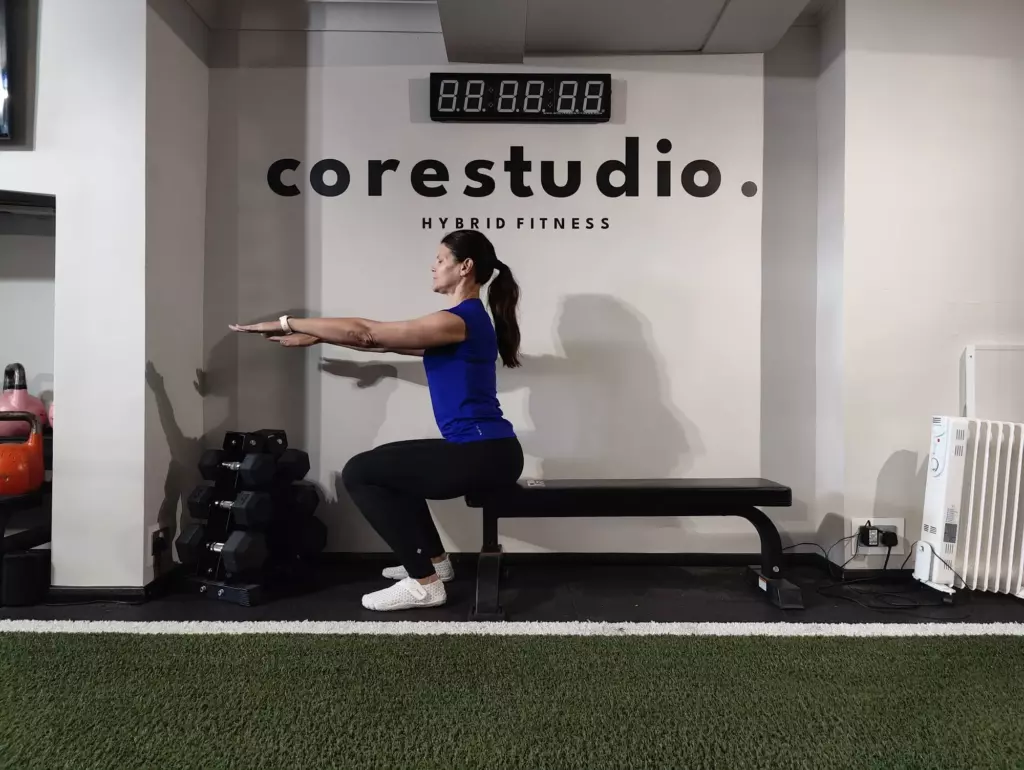
In this section, we’ll cover squat variations to improve your form and build confidence before moving to the free weights section. If you’re struggling with squats, don’t worry! I’ll teach you…
BOX SQUATS!
Squatting to a box is a great way to learn how to sit back and keep your weight on your whole foot. It prevents squatting with your knees forward and being up on your toes.
Squatting back to a box is awesome for folks with bad knees who can’t do bodyweight squats anymore.
While box squats with a barbell are an option, for this explanation, let’s stick with the simplicity of bodyweight box squats.
To achieve this, locate an appropriately sized box or chair that aligns your squat position with parallel when seated.
You have several alternatives to choose from, such as step stools, milk crates, or the smallest box available at the gym.
The lower the box, the better it’ll help you build stronger hips and lower back – the box at exactly parallel will give your quads more of a strength boost.
Just set up as if you were about to do a regular bodyweight squat, but stand about a foot in front of the box.
- Take a deep breath, engage your core, push your hips back, and ensure your knees align in the same direction as your toes. Lower yourself onto the box, fully seated, as you perform a squat.
Don’t just plop back on the box, take it slow and deliberate while keeping your whole body tight.
- Hold on, stay still! Let’s focus on your posture:
Is your back and core still engaged and strong?
Are you distributing your weight evenly between your heels and midfoot?
Is your head in a neutral position?
Perfect! Now, rise by thrusting your hips upward. Avoid shifting your weight forward onto your toes (push through your heels instead!). Keep your shoulders and chest lifted, and ensure your knees align with your toes as you push them outward.
When starting, you can sit on the box to assess your positioning. However, as you become more skilled, aim to sit back and swiftly rise again.
An indication of a well-executed squat is when you can effortlessly rise from the deepest point of the squat position without the need to lean forward or rely on momentum.
Perform a squat, effortlessly lowering your body until your buttocks gently touch the box, and rise back up without any unnecessary weight shifting.
KEEP THAT BUTT BACK!
How to Perform a Front Squat
If you fancy a similar yet different squat, give the front barbell squat a shot!
A front barbell squat shifts the weight from behind to in front of you, engaging different muscles and requiring mobility in various areas.
I get it, all of this can be a bit overwhelming, so here’s the deal – the important thing is that you just START!
I know I’m repeating myself, but seriously, I genuinely want you to kickstart your strength training journey today.
How to Perform a One-Legged Squat (The Pistol Squat)
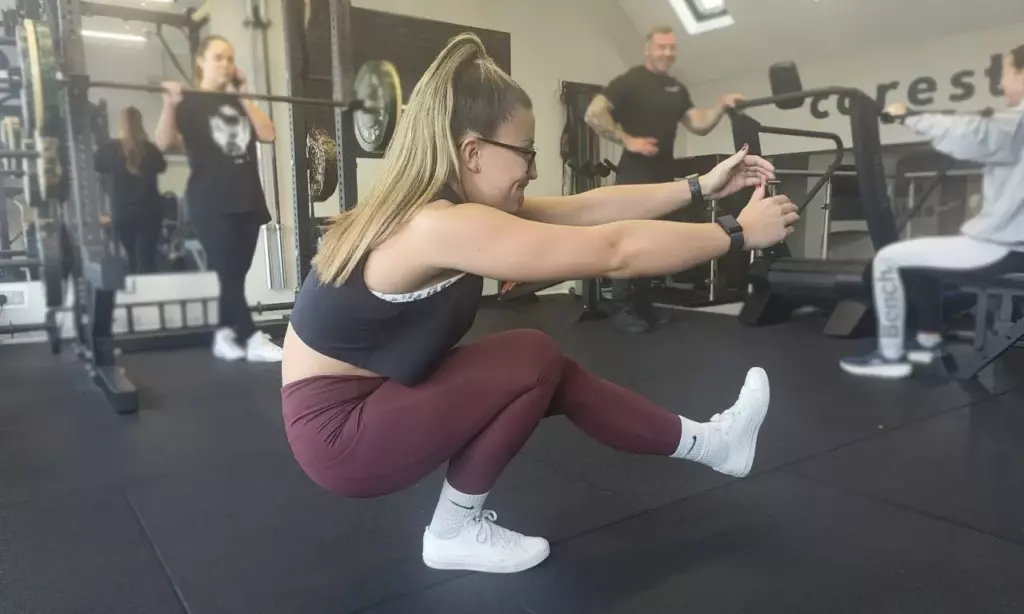
To execute a one-legged squat, lower yourself as far as possible while balancing on one leg. Ensure that your heel remains firmly planted on the ground while lifting the other leg in front of you. This movement can be visualized as follows:
If this feels like a lot, try giving an assisted one-legged squat a go.
To execute an assisted one-legged squat, grasp onto a sturdy doorframe, squat stand, rings, or any other stable object. Then, descend as far as possible while balancing on a single leg.
The Importance of Progression When Doing a Barbell Squat – How to Progress Safely
When doing a barbell squat, progression is essential to achieve the best results. Going too heavy too soon can cause injury and set you back, so it’s important to gradually increase the weight of your barbell over time.
This means keeping track of your sets and squat rep count, as well as how much weight you’re using for each rep. By gradually increasing the load on your muscles, you’ll be able to safely progress in strength while reducing the risk of injury. When progressing with your squats, remember to focus on perfecting your technique before you start adding more weight.
Having a solid foundation will help ensure that you keep proper form once you begin lifting heavier weights. It’s important to make sure you’re taking appropriate rest days between workouts and following a good nutrition plan so that your body can repair itself after each workout session.
Progressing with your squats can be an exciting journey towards achieving your health and fitness goals!
Upper Body Benefits from Doing a Barbell Squat
Simply put, your upper body plays a vital role in your Squat form. If your upper trunk positioning is off, the rest of your Squat will suffer. If you can’t find a good position with your upper body, it’s practically impossible to set your hips in the ideal position because your spine is in between.
One common mistake that many people make during the Squat is simply getting under the bar and placing it on their back without considering this crucial aspect. Unfortunately, this approach leads to neglecting important muscle groups, particularly the lats.
By generating tension in these muscles, you effectively minimize unnecessary movement in your spine. Taut muscles are adept at withstanding weight-induced stress, allowing your hips to seamlessly carry the load as intended.
Failure to engage the latissimus dorsi muscles results in improper positioning of the thoracic spine (upper back). Insufficient extension of the thoracic spine and lack of proper alignment impede full hip flexion at the bottom of the Squat and hinder the ability to fully sit back, leading to an incorrect squat posture.
Your torso plays a key role in maintaining a neutral spine position and providing stability. It’s responsible for keeping your shoulders from rounding and your chest from dropping during movements, which helps prevent immediate injuries.
The greater the upper body tension, the slimmer the chances of neglecting a muscle group that should be lending a helping hand to support that hefty weight on your back. Flex those muscles and feel the burn!
Creating tension in your upper body serves as a byproduct, facilitating the ability to lift heavier weights through concurrent activation potentiation. This phenomenon entails strength enhancements that result from the firing of adjacent muscle groups. To experience it firsthand, slowly clench your fist and notice the activation of your arm, shoulder, chest, and back muscles.
Properly gripping the bar with a firm hold can significantly enhance the neural drive to your upper body. This increased intensity and activation in your torso will ultimately result in a stronger and more stable Squat.
How can you rectify this prevalent oversight? The solution is quite straightforward. It boils down to a handful of essential setup tips.
How to Set Up Your Upper Body for the Squat
To get your upper trunk in position, think about how you hold the bar.
- Position the bar evenly on your back
Individuals frequently set the bar askew, neglecting to accurately position their hands and shoulders. Even a small half-inch discrepancy can yield significant consequences.
To rectify this, position yourself in front of the bar and place your hands where you feel at ease. Ideally, this should be near your shoulders, allowing for a natural and unencumbered stance.
- Engage your muscles
Prepare for the lift by creating tension and positioning yourself under the bar. Secure a firm grip on the bar and smoothly slide yourself underneath it. As you do this, engage your upper back muscles, specifically your lats and actively pull the bar into your back, instead of simply allowing it to rest there.
Remember to maintain tension throughout the entire exercise.
- Watch your elbow position
There are two scenarios to consider.
Firstly, when your elbows pop up and flare out, it leads to rounded shoulders, preventing you from flexing your lats and creating a tight upper back.
This, in turn, hinders your ability to provide a sturdy shelf for the bar to rest on. It’s important to avoid keeping your elbows directly under the bar as this outdated technique is associated with the habit of looking up.
In reality, it promotes an overly upright Squat position.
Secondly, it is recommended to keep your elbows and arms at the same angle as your torso. If you find yourself bent over at a 30-40 degree angle during a Squat, keep your elbows forward to follow the same plane as your torso.
This will help maintain proper form and alignment.
Ten Common Mistakes People Make When Doing Barbell Squats (and How to Avoid Them)
Although the squat is a fundamental exercise, newcomers to weightlifting frequently make a few common errors.
Let’s delve into some significant challenges and explore effective solutions to address them.!
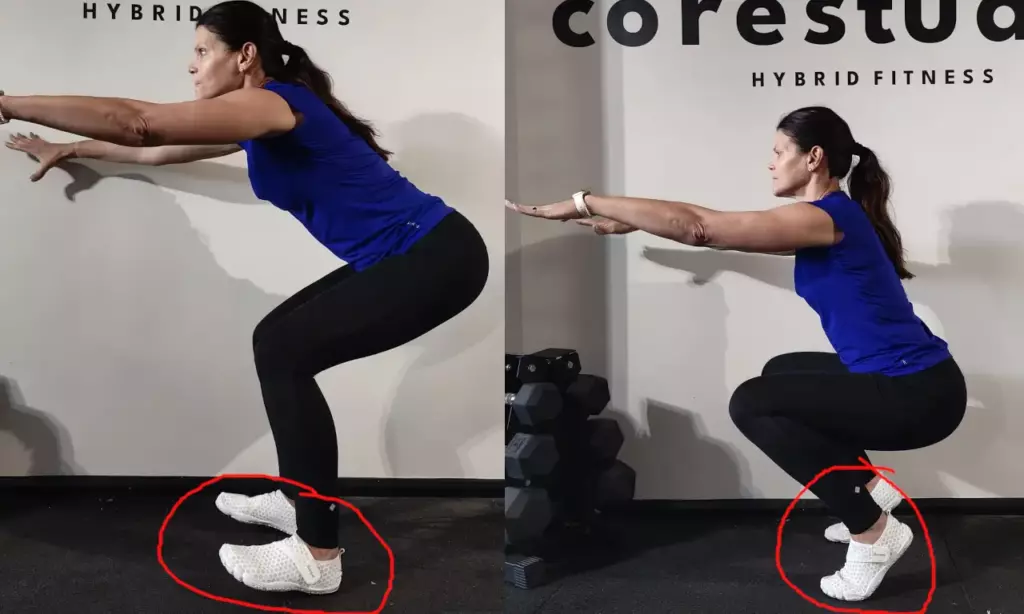
1. Elevating onto the balls of your feet with knees positioned forward while performing a squat.
Maintaining proper form during squats is crucial, and that includes keeping your heels firmly planted on the ground throughout the movement. By driving down through your heels, you can engage the right muscles and optimize your squatting technique.
While it’s natural for some weight to shift onto the balls of your feet, it’s important to avoid putting all your weight on them or your toes. A good test is to be able to lift your toes off the ground and wiggle the pinky toe without impacting your squat.
Remember, mastering this technique will enhance the effectiveness and safety of your squats.
2. Correct positioning of the knees and Foot Stance
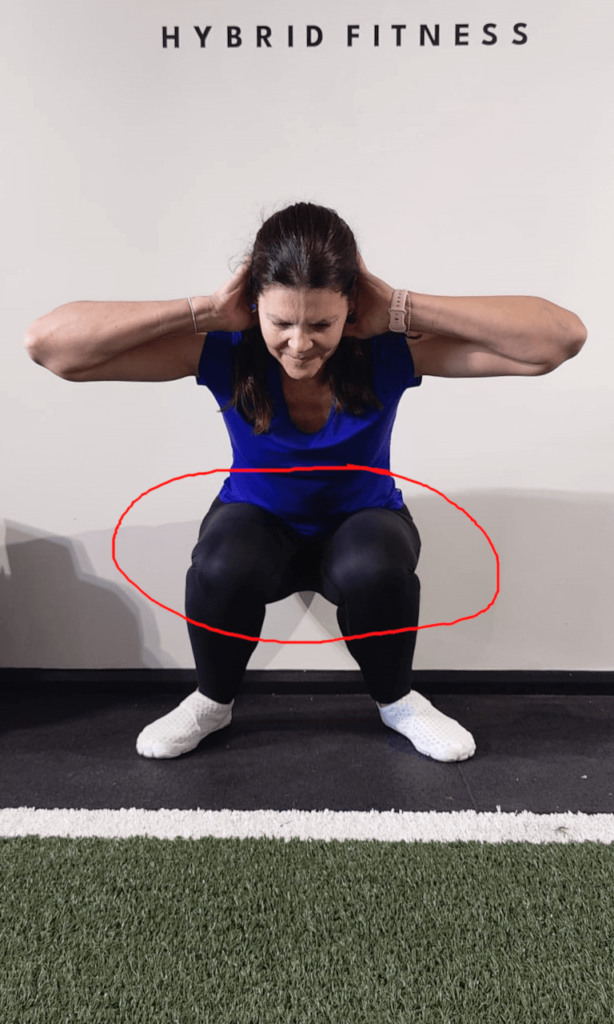
During squats, it is important to ensure that your knees align with the foot angle. This can be achieved by maintaining the same angle between your knees and feet throughout the entire movement.
Remember to observe the alignment of your knees and feet ensuring you have your toes pointed in the same direction as your knees.

Each person’s precise positioning may vary, yet it is important to avoid placing weight excessively on the outer or inner edges of the foot.
3. Positioning of the Back
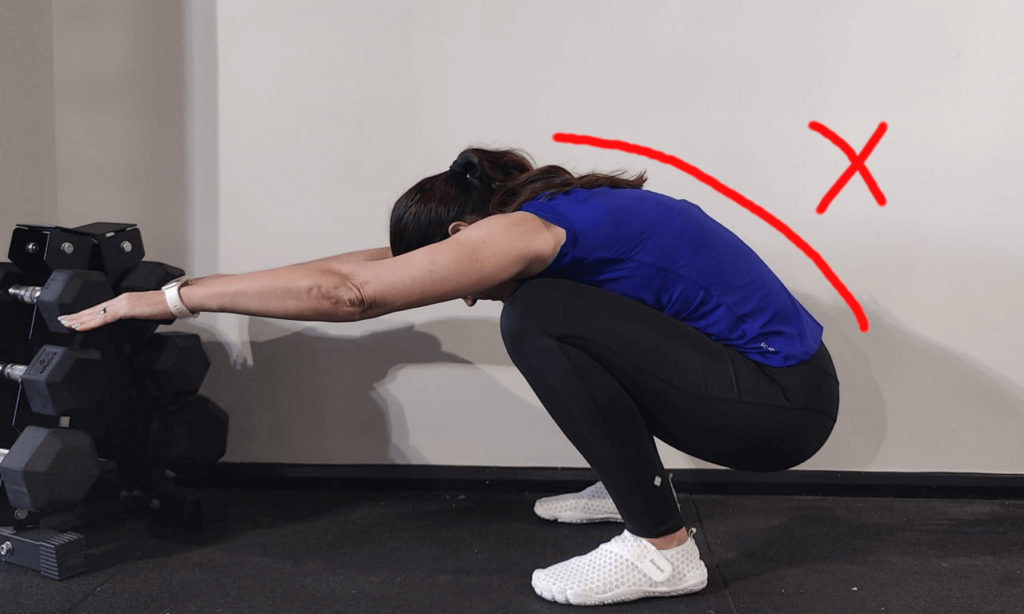
Maintain an upright chest and draw your shoulder blades back, as if you were King Kong, ready to proudly thump your chest. This posture should be maintained throughout the entire duration, providing three solid points of contact for the bar.
Avoid rounding your shoulders forward, but also be mindful not to hyperextend your back. Keeping your spine in a neutral position will ensure its safety and establish a sturdy foundation during the challenging squat exercise.
4. Proper Alignment of the Head
While it’s a common coaching cue to instruct lifters to look up, this advice may hinder rather than help your movement.
Take a quick second to gaze at the ceiling and marvel at its splendour! Don’t worry, I’ll patiently wait for your return.
Take a moment to assess the alignment of your neck vertebrae. It’s crucial to avoid an unsafe position that can strain your spine, especially as you add more weight to the equation. Instead of looking down at the floor, keep your gaze straight ahead throughout the entire exercise. Maintain a “neutral” position for your head, where you can comfortably hold a tennis ball between your chest and chin. This is perfectly fine.
5. Striving to maintain vertical shins while performing the exercise.
Unless there is an existing knee condition that may cause additional discomfort, it is acceptable and recommended for the shin to extend beyond the vertical position during squats. This flexibility often enables a deeper squat, leading to enhanced knee strength and stability.
The forward lean in the shins is also noticeable during various daily activities like climbing stairs or rising from a seated position.
While squatting, aim to go as low as possible without fixating on maintaining a completely vertical shin.
6. Placing excessive weight on the heels or the inside/outside of the feet during squats can negatively impact your form and technique.
When attempting to correct the issue of rising onto your toes or misaligning your knees, it is common for individuals to become overly fixated on keeping their weight solely on their heels, inadvertently neglecting to keep the balls of their feet grounded.
It’s important to note that some weight distribution on the balls of your feet is necessary for maintaining balance. Furthermore, it can be quite challenging to achieve proper balance if you are exclusively relying on your heels for support.
Likewise, it is crucial to avoid lifting the inner or outer edges of your feet off the ground during these exercises, as this can also lead to suboptimal outcomes. You need your mid foot grounded.
So, how can you identify and rectify these mistakes? The solution is simple! Consider recording yourself performing squats or seek guidance from a knowledgeable personal trainer who can pay special attention to these particular aspects. It is often surprising how different our movements appear compared to our perceptions, and having a video recording of the exercise is frequently the most effective way to make improvements.
7. Going Too Heavy Too Quick
Too heavy squats result in compromised form and an increased risk of injury. Always start with a lightweight to activate your muscles and prepare for a heavier session by progressing. However, stay within your limits to prevent injury.
8. Failure to activate the core or engage the glutes during the movement.
Instead of effectively strengthening the appropriate muscles, this can result in strain on the lower back and hamstrings. It is crucial to focus on the correct muscle groups to achieve optimal strength and avoid unnecessary discomfort.
9. Not going deep enough on your squats
To maximize the effectiveness of squats and engage a wider range of muscles, it is recommended to aim for at least parallel depth in your squat, where your hip joint goes below the knee.
Going lower is also an option, depending on your training goals. It’s important to note that squatting above parallel, also known as a partial squat, neglects the involvement of the hamstrings in the movement.
This can lead to increased pressure on the knee joint.
By dropping below parallel, you reduce the forces exerted on your knee, promoting better knee health and stability.
Unfortunately, there are many misconceptions surrounding squats and their impact on knee issues or hip pain.
It’s crucial to understand that the deeper you squat, the more activation you’ll achieve in your glutes.
Moreover, a study revealed that completing full squats is three times more effective than half squats for muscle growth.
So, if you’re looking to maximize your gains, reaching full depth in your squats is highly recommended.
FACT: A half squat achieves 20% relative muscle growth versus a full squat which will result in 60% muscle growth (source: PubMed)
A deeper squat is generally more challenging, requiring both strength and flexibility. However, the decision to squat to parallel should be based on your specific goals. If you’re having difficulty reaching depth, there could be various factors at play, such as limited ankle mobility, tight hip flexors and hamstrings, weak glutes, or improper pelvic alignment, among others. In our coaching program, we closely collaborate with clients to address these concerns. We often recommend ankle and hip mobility exercises to improve squat depth which will result in a more stable exercise.
10. Going too deep before you are ready
You need to perform a full range of motion to get maximum benefits from the squat exercise. However, this is not the same for everyone and some people may physically not be ready to complete a deep squat.
If Your Heels Raise or Your Upper Body Falls Forward
If towards the bottom of your squat, your upper body starts leaning forward, heels lift off the ground, or if you have your butt drop where your lower back rounds excessively into a “butt wink,” it’s a sign that you might not be ready to go that deep yet.
The most common reason is limited ankle mobility. In this case, give elevating your heels on weight plates a shot! Pro

Squats are awesome.
How awesome! Look at that golfer above owning the squat before going for the putt!
If you want to learn more about squats, or you’re looking to build more confidence before you get started, we have a few options for you:
Should you want to follow a tailor-made program designed around their life and goals, check out our popular 1-on-1 Online Coaching Program.
You’ll work with our certified instructors who will get to know you better than you know yourself, check your form, and program your workouts and nutrition for you.
Local to Sout East London? Book a session with Paul Mills Fitness and take your fitness journey to the next level.
A Summary of the Benefits of Doing a Barbell Squat
By taking care to practice proper form when performing a barbell squat, individuals of all ages and fitness levels can benefit from adding this compound exercise into their workout routine.
It is an effective way to increase leg muscle strength while also building core stability & balance which ultimately helps improve overall daily performance capacity & reduce the risk of injury from physical activity or everyday tasks alike.
I’d love to hear from you! Leave your questions, fitness or otherwise below!
What struggles do you have when trying to squat?
Is there anything else you need us to tell you to give you the confidence to start squatting TODAY?
Leave your comments below!
- Squats are a compound movement that recruits most of our muscles
This movement engages multiple muscle groups and joints, particularly the hip and knee joints.
Using dumbbells or barbells engages all major muscle groups, including those in your legs, hips, back, core, shoulders and arms.
This beastly exercise targets all muscle groups, triggering the production of anabolic hormones in your body.
So, you can burn fat and pack on muscle at the same time. Pretty awesome, right?
- Doing squats can beef up your bones and muscles, while also looking after your knees.
By strengthening your knees, hips, and whole body, you lower the risk of injuries during sports and everyday activities like getting up or down.
Deep, safe squats enhance flexibility, making you resilient and reducing the risk of future injuries.
The Bodyweight Squat
Whooah Cowboy (or girl).
Be careful not to run before you can walk. Jumping straight into a barbell squat may not be for you yet.
Unless you know you can properly squat confidently, keep reading, or else move on to the big boy (or girl) section. Good squat technique is crucial.
How to do a proper bodyweight squat with good form
Learn the fundamentals of executing a flawless bodyweight squat. Gain a comprehensive knowledge of all the essential aspects required to perform this exercise correctly.
Setup
The setup for the squat exercise is incredibly simple:
- Position your feet slightly wider than your hips.
- Point your toes slightly outward, at an angle of about 5 to 20 degrees (the wider your stance, the more you’ll need to rotate your feet outward).

- Gaze directly ahead and select a point on the wall directly in front of you.
- Focus on this spot throughout the entire squatting motion, avoiding the temptation to glance downward at the floor or upward at the ceiling.
Steps to do a bodyweight squat
- Extend your arms directly in front of you, aligning them parallel to the ground. Maintain a proud and upright chest, while keeping your spine in a neutral position.
- Ensure that your weight is evenly distributed on your feet, with a focus on placing it on the heels and the balls of your feet, as if they were firmly planted on the ground. Throughout the movement, you should have the ability to wiggle your toes, although this isn’t a requirement for squatting.
- Keep your entire body tight the entire time, with your core flexed like you’re preparing for a surprise belly bop!
- Take a deep breath, allowing your stomach to expand. Initiate the movement by hinging at your hips and pushing your buttocks back. As your knees start to bend, ensure that your hips are positioned back, emphasizing the correct sequencing of the movement rather than relying on keeping your knees bent.
- When performing a squat, it’s important to maintain proper alignment of your knees with your feet. For beginners, focus on pushing the knees outward to align with the feet. Avoid pushing them wider than your feet. It’s crucial to prevent inward knee movement during the exercise, a common mistake to watch out for.

- Get down in a squat until your hip joint goes lower than your knees (what we call “parallel” in the squat game). Note: if you THINK you might not be squatting deep enough, you probably aren’t!

When you reach the bottom, it’s time to rise back up gracefully from your squat position:
- With a focus on maintaining stability, exhale and powerfully push through your heels while ensuring the balls of your feet remain grounded.
- Maintain the outward drive of your knees, just as you did during the descent. At the top, engage your glutes by squeezing them firmly. This ensures effective utilization of your gluteal muscles.
Once you can knock out multiple sets of 15+ deep bodyweight squats with proper form, it’s time to level up to barbell squats!
Moving on to the Barbell Squat
The Barbell Squat is a killer exercise that, when done right, works almost all your muscles. It’s perfect for strengthening and building core and leg muscles, and it also does wonders for your stabilizer muscles.
Anatomy of a Barbell Squat – Breaking Down the Move
The barbell squat is an excellent exercise for strengthening the muscles of the lower body.
To begin with, first, you stand with your feet hip-width apart and hold a loaded barbell across your upper back with both hands.
Your grip should be slightly wider than shoulder-width apart with the weight evenly distributed across your back.
Next, you bend your knees and keep your chest up as you lower yourself into a squat position.
Make sure to keep your weight in your heels and push your knees out as you go down.
Keep lowering until the tops of your thighs are parallel to the ground, then pause and press yourself up to return to the starting position.
Throughout the squat movement, you have to keep your abdominal muscles engaged and maintain a neutral spine by looking forward with your chin slightly tucked in (not lifted). Also, make sure to breathe steadily throughout each rep.
As you lower into the squat, inhale through your nose and as you press up exhale through pursed lips (mouth closed). This helps engage additional muscles for stability while also providing proper oxygen flow during exercise.
Once you reach parallel (or just below), pause at that bottom position for one second before pressing back up to standing. This will ensure that you get full range of motion which will help build muscular strength over time and prevent injury.
When returning up, focus on driving through your heels while ensuring that your back remains in its natural arch throughout the entire movement – do not round it or lean forward overly far as this can put strain on other stabilizing muscles or cause injury.
Finally, aim to repeat this same movement continuously for a predefined amount of repetitions and sets, depending on individual fitness goals or current level of muscle endurance/strength/stamina.
Equipment Needed to do a Barbell Squat
- Squat Rack (recommended)
- Barbell
- Weight plates
- Mirror (optional but if you do not have a personal trainer it is a must)
Clothing and Footwear
- Comfortable (stretchy or oversized) pants or leggings
- Vest Top or similar (so you or your trainer can identify and make corrections to bad posture)
- Weight lifting shoes or flat gym trainers, or opt for a barefoot approach – IMPORTANT NOTE: Running shoes or similar are not ideal as you need stability and the cushioning in these shoes reduces your static stability
Barbell Squat Setup
STEP 1: Discover your squat rack! It will resemble this, featuring an unattached barbell:
A. Squat Stand:

B. Power Cage/Squat stand:

C. Half Rack (Least favourite*):

*I’m not a fan of Half-racks without adjustable safety bars, you know? If you drop to a low squatting depth, the barbell might end up hitting those immovable bars! Not cool, right? So, if you have the choice, go for the A or B options instead!
Note: A squat stand is vastly different from a Smith Machine, where the barbell is connected to the machine and moves up and down along two bars.

You do NOT want a Smith Machine.
To perform a barbell squat correctly and safely, it is crucial to have a completely unattached barbell. Avoid using a machine and instead choose a free barbell for optimal squat form.
This can be a debatable topic, and ultimately, it comes down to personal preference. However, I would like to present a few reasons why avoiding Smith Machine squats might be beneficial:
- The path of travel for the bar is restricted
- You are not using several key muscles as the machine is doing some of the work for you
- You are not using the same set of muscles as you would when doing a barbell squat
- Machine squats do not translate well into an unassisted barbell squat. If you regularly squat 100kg on a machine you will be in for a surprise when attempting a 100kg barbell squat as the bar will feel much heavier.
STEP 2: Set the height of the bar to be about the same height as your collarbone.
Unsure about how to adjust the bar height? Let me guide you:
When faced with options that are either too high or too low, it is advisable to set the pins slightly lower than your desired height.
This ensures that you won’t have to strain by getting up on your toes to rack or unrack the bar, particularly as the weight increases.
Prioritizing comfort and ease of use is crucial, especially when dealing with heavier loads.
STEP 3: Decide if you are going to do a high bar barbell squat or a low bar barbell squat. Either barbell squat is fine, but there IS a difference:

The “Low Bar Back Barbell Squat” is a widely practised technique embraced by beginners, general lifters, and powerlifters alike.
Starting Strength teaches this particular form, making it one of the top-notch beginner’s books available.
Henceforth, our focus shall remain on this version for the remainder of this section.
- Always do a barbell squat with just the bar to start
No matter your goal of squatting 300kgs, it’s always wise to begin with just the bar.
Starting with proper form and gradually adding weight will set a solid foundation for success.
Step By Step Guide on How to Do a Proper Barbell Back Squat

So, you’re gonna face the bar, step under it, and put your hands around it on either side of you. Now, for this type of barbell squat in our example, we’re gonna want a thumbless grip. That way, our wrists are properly aligned with our forearms.

The width of your grip relies on flexibility. However, typically, a narrower grip (hands closer to your shoulders) aids in creating a substantial platform for resting the bar on the meaty upper traps of your upper back. This positioning allows for optimal support and stability.
If you lack the flexibility for the narrower grip (which is super common), start wider, then slowly bring it in as you get more flexible.
See the difference here between a “high bar, wrapped grip” (Left) and a “low bar, thumbless grip” (right):

Time to unleash the beast mode with a back barbell squat! Let’s squat it like it’s hot!

Make sure to check out the video below, give it a listen and follow the instructions. If you need to restart, just come back and read this description.
Let’s break it down step by step:
- Take a moment to step back from the supports with the weight on your shoulders.
- Make sure your feet are a tad wider than hip-width apart.
- Angle your toes slightly outwards, just a bit.
- Alright, let’s do this! Activate your core, tighten those glutes, and take a nice deep breath into your belly.
- Take it nice and easy as you squat down, shifting your butt back. Keep going until your legs are parallel or even lower – basically, the hip crease should be below your waist.
- Now, explode back up to the starting position.
- After completing your set, proceed with caution as you walk forward to return the weight to the rack, gently lowering it onto the supports while ensuring safety.
Give yourself a high-five because you just rocked that barbell squat! Keep up the awesome work!
Not sure if your barbell squat is deep enough?
Record yourself or have your trainer evaluate your movements. You know, most people I see doing a barbell squat in a gym don’t go deep enough!
How To Bail Out of a Squat Safely
If you’re gonna do a barbell squat, you gotta know how to “fail” at squatting safely! I mean, seriously, there’s nothing scarier than being stuck at the bottom of a squat and not having a clue how to get out of there!
A barbell squat is quite different from a barbell deadlift in that regard: if you struggle with a deadlift, you simply don’t lift the weight.
If you mess up a barbell squat, you’re stuck under a bar… with possibly loads of weight on top.
This can lead to SERIOUS injury. So please, learn how to bail out of a barbell squat safely before you start attempting to do a heavy barbell squat.
This will help you gain the confidence to push yourself and get stronger!
Proper Form Tips for an Effective Barbell Squat
Whole Body Tension
Whole body tension is an important part of maintaining proper form and technique during a barbell squat. When performing a barbell squat, the whole body must remain tight and engaged to properly execute the move.
This keeps the core stable and helps to ensure that the knees stay aligned with the toes, which reduces any undue stress put on the joints or muscles in the lower body. It also helps to improve balance, stability, and power during the exercise.
Whole body tension also helps to protect against potential injuries while lifting heavy weights by allowing for better control of the barbell. Overall, maintaining proper whole-body tension when performing a barbell squat is essential for both the safety and effective execution of this exercise.
Feet Shoulder Width
Feet should be shoulder width apart for barbell squats because it provides the most stability. When your feet are too close together, it can cause instability and imbalance, which makes it difficult to stay in proper form and puts unnecessary strain on your upper back muscles.
On the other hand, when your feet are too far apart, you won’t be able to get low enough into a squat position and distribute the weight evenly. Shoulder width keeps your centre of gravity balanced and allows you to reach full depth without excessively arching your back.
Keeping your feet shoulder-width apart helps proper form while also preventing any potential injury.
Hands Wider Than Shoulder Width Apart
Hands should be slightly more than shoulder width apart when performing a barbell squat because it helps to keep your torso stable and upright. When you have your hands too close together, it can cause your torso to lean forward, which can lead to poor posture and form.
But having your hands slightly wider than shoulder-width will ensure that you stay steady throughout the entire exercise. In addition, having your hands wider than shoulder-width apart can also help to engage more of the muscles in your back and legs for a more effective workout.
Different Variations of the Barbell Squat and How to Incorporate Into Your Workout
Different Squat Options for Beginners (Box Squat):

In this section, we’ll cover squat variations to improve your form and build confidence before moving to the free weights section. If you’re struggling with squats, don’t worry! I’ll teach you…
BOX SQUATS!
Squatting to a box is a great way to learn how to sit back and keep your weight on your whole foot. It prevents squatting with your knees forward and being up on your toes.
Squatting back to a box is awesome for folks with bad knees who can’t do bodyweight squats anymore.
While box squats with a barbell are an option, for this explanation, let’s stick with the simplicity of bodyweight box squats.
To achieve this, locate an appropriately sized box or chair that aligns your squat position with parallel when seated.
You have several alternatives to choose from, such as step stools, milk crates, or the smallest box available at the gym.
The lower the box, the better it’ll help you build stronger hips and lower back – the box at exactly parallel will give your quads more of a strength boost.
Just set up as if you were about to do a regular bodyweight squat, but stand about a foot in front of the box.
- Take a deep breath, engage your core, push your hips back, and ensure your knees align in the same direction as your toes. Lower yourself onto the box, fully seated, as you perform a squat.
Don’t just plop back on the box, take it slow and deliberate while keeping your whole body tight.
- Hold on, stay still! Let’s focus on your posture:
Is your back and core still engaged and strong?
Are you distributing your weight evenly between your heels and midfoot?
Is your head in a neutral position?
Perfect! Now, rise by thrusting your hips upward. Avoid shifting your weight forward onto your toes (push through your heels instead!). Keep your shoulders and chest lifted, and ensure your knees align with your toes as you push them outward.
When starting, you can sit on the box to assess your positioning. However, as you become more skilled, aim to sit back and swiftly rise again.
An indication of a well-executed squat is when you can effortlessly rise from the deepest point of the squat position without the need to lean forward or rely on momentum.
Perform a squat, effortlessly lowering your body until your buttocks gently touch the box, and rise back up without any unnecessary weight shifting.
KEEP THAT BUTT BACK!
How to Perform a Front Squat
If you fancy a similar yet different squat, give the front barbell squat a shot!
A front barbell squat shifts the weight from behind to in front of you, engaging different muscles and requiring mobility in various areas.
I get it, all of this can be a bit overwhelming, so here’s the deal – the important thing is that you just START!
I know I’m repeating myself, but seriously, I genuinely want you to kickstart your strength training journey today.
How to Perform a One-Legged Squat (The Pistol Squat)

To execute a one-legged squat, lower yourself as far as possible while balancing on one leg. Ensure that your heel remains firmly planted on the ground while lifting the other leg in front of you. This movement can be visualized as follows:
If this feels like a lot, try giving an assisted one-legged squat a go.
To execute an assisted one-legged squat, grasp onto a sturdy doorframe, squat stand, rings, or any other stable object. Then, descend as far as possible while balancing on a single leg.
The Importance of Progression When Doing a Barbell Squat – How to Progress Safely
When doing a barbell squat, progression is essential to achieve the best results. Going too heavy too soon can cause injury and set you back, so it’s important to gradually increase the weight of your barbell over time.
This means keeping track of your sets and squat rep count, as well as how much weight you’re using for each rep. By gradually increasing the load on your muscles, you’ll be able to safely progress in strength while reducing the risk of injury. When progressing with your squats, remember to focus on perfecting your technique before you start adding more weight.
Having a solid foundation will help ensure that you keep proper form once you begin lifting heavier weights. It’s important to make sure you’re taking appropriate rest days between workouts and following a good nutrition plan so that your body can repair itself after each workout session.
Progressing with your squats can be an exciting journey towards achieving your health and fitness goals!
Upper Body Benefits from Doing a Barbell Squat
Simply put, your upper body plays a vital role in your Squat form. If your upper trunk positioning is off, the rest of your Squat will suffer. If you can’t find a good position with your upper body, it’s practically impossible to set your hips in the ideal position because your spine is in between.
One common mistake that many people make during the Squat is simply getting under the bar and placing it on their back without considering this crucial aspect. Unfortunately, this approach leads to neglecting important muscle groups, particularly the lats.
By generating tension in these muscles, you effectively minimize unnecessary movement in your spine. Taut muscles are adept at withstanding weight-induced stress, allowing your hips to seamlessly carry the load as intended.
Failure to engage the latissimus dorsi muscles results in improper positioning of the thoracic spine (upper back). Insufficient extension of the thoracic spine and lack of proper alignment impede full hip flexion at the bottom of the Squat and hinder the ability to fully sit back, leading to an incorrect squat posture.
Your torso plays a key role in maintaining a neutral spine position and providing stability. It’s responsible for keeping your shoulders from rounding and your chest from dropping during movements, which helps prevent immediate injuries.
The greater the upper body tension, the slimmer the chances of neglecting a muscle group that should be lending a helping hand to support that hefty weight on your back. Flex those muscles and feel the burn!
Creating tension in your upper body serves as a byproduct, facilitating the ability to lift heavier weights through concurrent activation potentiation. This phenomenon entails strength enhancements that result from the firing of adjacent muscle groups. To experience it firsthand, slowly clench your fist and notice the activation of your arm, shoulder, chest, and back muscles.
Properly gripping the bar with a firm hold can significantly enhance the neural drive to your upper body. This increased intensity and activation in your torso will ultimately result in a stronger and more stable Squat.
How can you rectify this prevalent oversight? The solution is quite straightforward. It boils down to a handful of essential setup tips.
How to Set Up Your Upper Body for the Squat
To get your upper trunk in position, think about how you hold the bar.
- Position the bar evenly on your back
Individuals frequently set the bar askew, neglecting to accurately position their hands and shoulders. Even a small half-inch discrepancy can yield significant consequences.
To rectify this, position yourself in front of the bar and place your hands where you feel at ease. Ideally, this should be near your shoulders, allowing for a natural and unencumbered stance.
- Engage your muscles
Prepare for the lift by creating tension and positioning yourself under the bar. Secure a firm grip on the bar and smoothly slide yourself underneath it. As you do this, engage your upper back muscles, specifically your lats and actively pull the bar into your back, instead of simply allowing it to rest there.
Remember to maintain tension throughout the entire exercise.
- Watch your elbow position
There are two scenarios to consider.
Firstly, when your elbows pop up and flare out, it leads to rounded shoulders, preventing you from flexing your lats and creating a tight upper back.
This, in turn, hinders your ability to provide a sturdy shelf for the bar to rest on. It’s important to avoid keeping your elbows directly under the bar as this outdated technique is associated with the habit of looking up.
In reality, it promotes an overly upright Squat position.
Secondly, it is recommended to keep your elbows and arms at the same angle as your torso. If you find yourself bent over at a 30-40 degree angle during a Squat, keep your elbows forward to follow the same plane as your torso.
This will help maintain proper form and alignment.
Ten Common Mistakes People Make When Doing Barbell Squats (and How to Avoid Them)

Although the squat is a fundamental exercise, newcomers to weightlifting frequently make a few common errors.
Let’s delve into some significant challenges and explore effective solutions to address them.!
1. Elevating onto the balls of your feet with knees positioned forward while performing a squat.
Maintaining proper form during squats is crucial, and that includes keeping your heels firmly planted on the ground throughout the movement. By driving down through your heels, you can engage the right muscles and optimize your squatting technique.
While it’s natural for some weight to shift onto the balls of your feet, it’s important to avoid putting all your weight on them or your toes. A good test is to be able to lift your toes off the ground and wiggle the pinky toe without impacting your squat.
Remember, mastering this technique will enhance the effectiveness and safety of your squats.
2. Correct positioning of the knees and Foot Stance

During squats, it is important to ensure that your knees align with the foot angle. This can be achieved by maintaining the same angle between your knees and feet throughout the entire movement.
Remember to observe the alignment of your knees and feet ensuring you have your toes pointed in the same direction as your knees.

Each person’s precise positioning may vary, yet it is important to avoid placing weight excessively on the outer or inner edges of the foot.
3. Positioning of the Back

Maintain an upright chest and draw your shoulder blades back, as if you were King Kong, ready to proudly thump your chest. This posture should be maintained throughout the entire duration, providing three solid points of contact for the bar.
Avoid rounding your shoulders forward, but also be mindful not to hyperextend your back. Keeping your spine in a neutral position will ensure its safety and establish a sturdy foundation during the challenging squat exercise.
4. Proper Alignment of the Head
While it’s a common coaching cue to instruct lifters to look up, this advice may hinder rather than help your movement.
Take a quick second to gaze at the ceiling and marvel at its splendour! Don’t worry, I’ll patiently wait for your return.
Take a moment to assess the alignment of your neck vertebrae. It’s crucial to avoid an unsafe position that can strain your spine, especially as you add more weight to the equation. Instead of looking down at the floor, keep your gaze straight ahead throughout the entire exercise. Maintain a “neutral” position for your head, where you can comfortably hold a tennis ball between your chest and chin. This is perfectly fine.
5. Striving to maintain vertical shins while performing the exercise.
Unless there is an existing knee condition that may cause additional discomfort, it is acceptable and recommended for the shin to extend beyond the vertical position during squats. This flexibility often enables a deeper squat, leading to enhanced knee strength and stability.
The forward lean in the shins is also noticeable during various daily activities like climbing stairs or rising from a seated position.
While squatting, aim to go as low as possible without fixating on maintaining a completely vertical shin.
6. Placing excessive weight on the heels or the inside/outside of the feet during squats can negatively impact your form and technique.
When attempting to correct the issue of rising onto your toes or misaligning your knees, it is common for individuals to become overly fixated on keeping their weight solely on their heels, inadvertently neglecting to keep the balls of their feet grounded.
It’s important to note that some weight distribution on the balls of your feet is necessary for maintaining balance. Furthermore, it can be quite challenging to achieve proper balance if you are exclusively relying on your heels for support.
Likewise, it is crucial to avoid lifting the inner or outer edges of your feet off the ground during these exercises, as this can also lead to suboptimal outcomes. You need your mid foot grounded.
So, how can you identify and rectify these mistakes? The solution is simple! Consider recording yourself performing squats or seek guidance from a knowledgeable personal trainer who can pay special attention to these particular aspects. It is often surprising how different our movements appear compared to our perceptions, and having a video recording of the exercise is frequently the most effective way to make improvements.
7. Going Too Heavy Too Quick
Too heavy squats result in compromised form and an increased risk of injury. Always start with a lightweight to activate your muscles and prepare for a heavier session by progressing. However, stay within your limits to prevent injury.
8. Failure to activate the core or engage the glutes during the movement.
Instead of effectively strengthening the appropriate muscles, this can result in strain on the lower back and hamstrings. It is crucial to focus on the correct muscle groups to achieve optimal strength and avoid unnecessary discomfort.
9. Not going deep enough on your squats
To maximize the effectiveness of squats and engage a wider range of muscles, it is recommended to aim for at least parallel depth in your squat, where your hip joint goes below the knee.
Going lower is also an option, depending on your training goals. It’s important to note that squatting above parallel, also known as a partial squat, neglects the involvement of the hamstrings in the movement.
This can lead to increased pressure on the knee joint.
By dropping below parallel, you reduce the forces exerted on your knee, promoting better knee health and stability.
Unfortunately, there are many misconceptions surrounding squats and their impact on knee issues or hip pain.
It’s crucial to understand that the deeper you squat, the more activation you’ll achieve in your glutes.
Moreover, a study revealed that completing full squats is three times more effective than half squats for muscle growth.
So, if you’re looking to maximize your gains, reaching full depth in your squats is highly recommended.
FACT: A half squat achieves 20% relative muscle growth versus a full squat which will result in 60% muscle growth (source: PubMed)
A deeper squat is generally more challenging, requiring both strength and flexibility. However, the decision to squat to parallel should be based on your specific goals. If you’re having difficulty reaching depth, there could be various factors at play, such as limited ankle mobility, tight hip flexors and hamstrings, weak glutes, or improper pelvic alignment, among others. In our coaching program, we closely collaborate with clients to address these concerns. We often recommend ankle and hip mobility exercises to improve squat depth which will result in a more stable exercise.
10. Going too deep before you are ready
You need to perform a full range of motion to get maximum benefits from the squat exercise. However, this is not the same for everyone and some people may physically not be ready to complete a deep squat.
If Your Heels Raise or Your Upper Body Falls Forward
If towards the bottom of your squat, your upper body starts leaning forward, heels lift off the ground, or if you have your butt drop where your lower back rounds excessively into a “butt wink,” it’s a sign that you might not be ready to go that deep yet.
The most common reason is limited ankle mobility. In this case, give elevating your heels on weight plates a shot! Pro

Squats are awesome.
How awesome! Look at that golfer above owning the squat before going for the putt!
If you want to learn more about squats, or you’re looking to build more confidence before you get started, we have a few options for you:
Should you want to follow a tailor-made program designed around their life and goals, check out our popular 1-on-1 Online Coaching Program.
You’ll work with our certified instructors who will get to know you better than you know yourself, check your form, and program your workouts and nutrition for you.
Local to Sout East London? Book a session with Paul Mills Fitness and take your fitness journey to the next level.
A Summary of the Benefits of Doing a Barbell Squat
By taking care to practice proper form when performing a barbell squat, individuals of all ages and fitness levels can benefit from adding this compound exercise into their workout routine.
It is an effective way to increase leg muscle strength while also building core stability & balance which ultimately helps improve overall daily performance capacity & reduce the risk of injury from physical activity or everyday tasks alike.
I’d love to hear from you! Leave your questions, fitness or otherwise below!
What struggles do you have when trying to squat?
Is there anything else you need us to tell you to give you the confidence to start squatting TODAY?
Leave your comments below!


